Beginner’s guide to UrT
 Dieser Artikel wurde ins Deutsche übersetzt.
Conventions used:
Words in angle brackets <like this> mean you have to type whatever corresponds to the word, leaving out the brackets: /record <filename> means you’d have to input your desired filename (without brackets) in place of <filename>, as in /record wallhaxx0r (which would record a demo named wallhaxx0r.dm_68 (on 4.1) or wallhaxx0r.urtdemo (on 4.2)).
Console commands that don’t have an example value given are yes-no toggles: “1” to enable, “0” to disable.
“Vanilla client” refers to the default executable (ioUrbanTerror or Quake3-UrT) that comes with the official installation from Frozen Sand. Although Urban Terror began as a Quake III Arena mod, starting with 4.0 it has been compatible with several standalone engines, forked from the ioquake3 codebase.
Questions this article doesn’t answer should be pointed at the official Urban Terror forum, after having read the official FAQ and the official manual.
Online presence
- Official:
- Website (news, downloads, forum and manual)
- Leagues:
- Urban Zone, the main league
- UrT:LA, the South American league
- Meta:
- UrTStats, collecting metadata about player numbers, gamemodes, maps, etc
What this game has and doesn’t have
Depending on what games you’re used to, UrT may exhibit surprising behavior or lack features you’d expect. This is a partial list of such idiosyncracies.
- All servers are run independently from Frozen Sand (the developers) and they may have quite different rules regarding what’s acceptable behavior. Should you get banned for, say, rude language, the official forum is not the right place to ask for an unban (or to insult the developers for maintaining such a retarded game, for that matter). All bans and kicks are decided by the admin(s) of that particular server and you should try and find their contact information. Most servers publish the admin’s e-mail address which is visible under “Server info” in any server browser including the built-in one.
- Although you can see many servers of 32 slots or more, the amount of players recommended by the developers is 16 or less. If your first reaction after connecting to a server is “omfg what a crappy lagfest”, you may want to try smaller ones;-)
- The gameplay is blend of arena and “realistic” shooters: weapons are quite realistic, kills with one to three shots are possible, but jumping is not restricted in any way (in fact, there are more ways to jump than in Quake 3). All weapons (except for knife and both launched and thrown grenades) are hitscan (no game-imposed delay between shooting and hitting and no bullet drop). There are separate walk, run and sprint, and you have stamina that can be depleted; however, you can’t lean or go prone (you can run but you can’t hide;-)). Climbing is not limited to ladders: you can grab any ledge you can reach and pull yourself up. Your health does not directly affect your speed (except for an unbandaged leg wound) or aim, but it does reduce your stamina and therefore the time you can sprint. By default hit sounds are enabled, playing a “plink” sound every time your bullet hits a living body.
- There are no restricted items in this game: no random-drop hats, no store-bought golden guns, no grind-earned upgrades. Everything you can see you can use. There are no classes nor perks and no earned ranks (gameplay statistics are implemented using external software that most servers have).
- There are no player classes or equipment restrictions; you can drop your empty rifle, pick up a sniper from a fallen foe, and continue playing. Weapons and items are not bought, you can select anything that slot limits allow and change the selection as many times as you like. However, after you’ve moved or fired a shot, any following gear changes will not take effect until you respawn. You can select gear while dead or in spectator mode.
- No incremental reload nor keeping half-empty magazines — when you reload, you lose the unused ammo in the previous magazine. Also, there’s no autoreload; when you hear the click of death, press R, switch weapons, or die like a (wo)man.
- When swimming, your ascent/descent can also be controlled by jump/crouch keys, not just by the direction of your view. This allows you to strafe and aim just like on ground. On ladders, forward always moves up and backpedal down, regardless of the direction of your view. Ladders are old-school, you stick to the surface when you touch it, but this only works if you’re facing it: if you turn to the side too far you’ll fall off. You can’t slide down ladders but you can drop down and then at the last moment turn around to stop without injury.
- Knife is not an instakill weapon, doing different damage in different hitzones (only hit in an unprotected head kills instantly). Due to players’ agility and speed and the high ROF for knife in UrT, knife kills are not regarded quite as humiliating as in some other games. Thrown knife has very flat but slightly rising trajectory, making hitting anything quite hard.
- There are no iron sights1); aiming is done in the oldschool style, with a crosshair.
- Gameplay does not have randomized events: there are no ricochets, the weapons never overheat or jam, etc.
- By default you pick up dropped weapons and items automatically. In Urban Terror 4.2 you can disable this — only picking up items if you aim at them and press the use key — by entering
/cg_autopickup 0in the console.
Downloading and installing
Right now, Urban Terror is slowly transitioning from 4.1 to 4.2 version, the latter being updated quite often (averaging a point release per month). At any given time, there are about 60 4.1 servers and 160 4.2 servers online. Official support for 4.1 has been discontinued, the 4.1 subforums locked and the master server does not track this version anymore. This article includes directions for both versions.
Currently, DSWP has one 4.1 and five 4.2 servers.
4.2
![]() Urban Terror 4.22) is incompatible with the previous 4.1 — while you can copy over your configs, you can’t play on older servers. Do not attempt to install 4.2 as an update to 4.1 (in the same folder), this will break both versions. If you want to keep both versions with no conflicts you should set a different location for the configs of your 4.2 installation — for example, on Linux the default location is
Urban Terror 4.22) is incompatible with the previous 4.1 — while you can copy over your configs, you can’t play on older servers. Do not attempt to install 4.2 as an update to 4.1 (in the same folder), this will break both versions. If you want to keep both versions with no conflicts you should set a different location for the configs of your 4.2 installation — for example, on Linux the default location is /home/<username>/.q3a, to change it add +set fs_homepath /home/<username>/.q3a_42 to the engine path in your shortcut or startup script. Entering fs_homepath with no arguments in the UrT console shows you its current value.
![]() When you visit the download page you may see a colorful “Download now” or “Play now” banner at the top of the page. This has nothing to do with Urban Terror, these banners are Google ads. The correct download links are text links further down the page. You do not have to register to download the game, especially not on another site. (You can register an account on urbanterror.info which will be your in-game account.)
When you visit the download page you may see a colorful “Download now” or “Play now” banner at the top of the page. This has nothing to do with Urban Terror, these banners are Google ads. The correct download links are text links further down the page. You do not have to register to download the game, especially not on another site. (You can register an account on urbanterror.info which will be your in-game account.)
The newest version is 4.2.023, released in January 19.
- The download page (including download links for full ZIP and an update from previous point release)
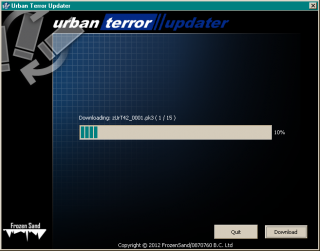
Unlike in previous versions the main deployment method for 4.2 is a dedicated downloader called UrTUpdater. (If you have trouble with the updater you can download a full ZIP or a smaller update ZIP instead.)
Windows and Linux updaters come as ZIP and TAR.GZ archives, respectively. Extract the contents to where you want to install the game, and run the updater. Note that you have to extract all of the contents of the archive, that is, the updater has to be inside the UrbanTerror42 folder — otherwise, after successfully running the updater, all the game content would be scattered among the other files and folders.
![]() In case you have an earlier updater (pre-4.2.010 release), you will have to download the new one. The latest version is capable of doing MD5 checks on the existing files and re-downloading them even in the middle of an update if any of them turns out to be broken.
In case you have an earlier updater (pre-4.2.010 release), you will have to download the new one. The latest version is capable of doing MD5 checks on the existing files and re-downloading them even in the middle of an update if any of them turns out to be broken.
The updater behavior is slightly counter-intuitive in that it only checks the integrity of the PK3s, meaning that if you end up with a broken client (Quake3-UrT.*) the only way to fix it is to delete a small PK3 before running the updater again — otherwise the confirmation dialog for client update won’t be shown.
Version history (ancillary files have not been updated since .001, binaries have been updated in pretty much every version — occasionally this has included the updater itself):
- .001 included zUrT42_0001.pk3 through zUrT42_0009.pk3
- .002 added zUrT42_0010.pk3
- .003 added zUrT42_0011.pk3
- .004 added zUrT42_0012.pk3 and zUrT42_qvm.pk3; replaced zUrT42_0009.pk3 through zUrT42_0011.pk3
- .005 added zUrT42_0013.pk3; replaced zUrT42_0008.pk3 through zUrT42_0012.pk3 and zUrT42_qvm.pk3
- .006 added zUrT42_0014.pk3 and zUrT42_0015.pk3; replaced zUrT42_0008.pk3 through zUrT42_0012.pk3 and zUrT42_qvm.pk3
- .007 added zUrT42_0016.pk3; replaced zUrT42_0009.pk3, zUrT42_0011.pk3 and zUrT42_qvm.pk3
- .008 added zUrT42_0017.pk3; replaced zUrT42_0009.pk3, zUrT42_0011.pk3, zUrT42_0013.pk3, zUrT42_0016.pk3 and zUrT42_qvm.pk3
- .009 added zUrT42_0018.pk3; replaced zUrT42_0009.pk3, zUrT42_0016.pk3 and zUrT42_qvm.pk3
- .010 added zUrT42_0019.pk3; replaced zUrT42_0006.pk3, zUrT42_0009.pk3, zUrT42_0011.pk3, zUrT42_0013.pk3, zUrT42_0014.pk3, zUrT42_0018.pk3 and zUrT42_qvm.pk3
- .011 added zUrT42_0020.pk3; replaced zUrT42_0009.pk3, zUrT42_0011.pk3, zUrT42_0013.pk3, zUrT42_0018.pk3 and zUrT42_qvm.pk3
- .012 added zUrT42_0021.pk3; replaced zUrT42_0011.pk3 and zUrT42_qvm.pk3
- .013 added zUrT42_0022.pk3; replaced zUrT42_0009.pk3, zUrT42_0011.pk3, zUrT42_0018.pk3 and zUrT42_qvm.pk3
- .014 replaced zUrT42_0018.pk3 and zUrT42_qvm.pk3
- .015 added zUrT42_0023.pk3 and zUrT42_0024.pk3; replaced zUrT42_0009.pk3, zUrT42_0018.pk3 and zUrT42_qvm.pk3
- .016 added zUrT42_0025.pk3; replaced zUrT42_0009.pk3, zUrT42_0013.pk3, zUrT42_0018.pk3, zUrT42_0022.pk3 and zUrT42_qvm.pk3
- .017 replaced zUrT42_qvm.pk3
- .018 added zUrT42_0026.pk3; replaced zUrT42_0013.pk3 and zUrT42_qvm.pk3
- .019 added zUrT42_0027.pk3 and zUrT42_0028.pk3; replaced zUrT42_0009.pk3 and zUrT42_qvm.pk3
- .020 replaced zUrT42_0009.pk3, zUrT42_0026.pk3 and zUrT42_qvm.pk3
- .021 added zUrT42_0029.pk3; replaced zUrT42_0009.pk3 and zUrT42_qvm.pk3
- .022 added zUrT42_0030.pk3; replaced zUrT42_0009.pk3, zUrT42_0029.pk3 and zUrT42_qvm.pk3
- .023 replaced zUrT42_qvm.pk3
All old PK3s up to 4.2.018 along with a readme detailing their use are available as a torrent.
Barbatos is hosting the official mirror for old versions (full versions and update packs from 4.2.012 to 4.2.019). diRf! clan website has full downloads from 4.2.011 to 4.2.017. 6th Floor website has full downloads and upgrade packs from 4.2.011 to 4.2.018 (as well as many pre-4.x versions).
Auth
The shiny new thing in 4.2 is called “auth” — if you have registered on the official UrT forum, you can (and should) request an auth key via your account page3) (“My game auth key” in the right-hand column). Think of the auth key as an in-game username + password rolled into one. Using auth is not compulsory and most servers allow you to play without4).
Auth key ties your forum account to your in-game identity, ensuring you’ll be identified as yourself across all auth-enabled servers (different and independent from GUID-based identification used in 4.1). Being authed is supposed to keep you name and tag from being stolen, and give you some protection against cheating accusations — you could easily prove you are indeed the same player who pwns in T3h L33t UrT L34gu3 and not some random kid with downloaded skills. In the bright happy future Frozen Sand envisions, most if not all servers have auth compulsory and this makes life much harder for cheaters — getting permbanned means you’ll need to register a new account etc.
Your auth is your identity — never give your auth key to anyone else. The only place you’re ever supposed to enter your auth key is the login box in the game; if anyone tells you that they need your auth key (to help with your technical issues, for example), they’re lying. Frozen Sand will never send you an e-mail asking for any of your account information. If you want to play in leagues, you will be asked to “enter your auth” — this means your auth name (nickname), not the authkey.
Before you allow someone else to copy your installation, make sure you either log out via the menu or remove the authkey file, located where your configs are. If you have the slightest suspicion that your auth key might have leaked, change it immediately; it’s free and takes effect as soon as you click the button.
When registering on the site your desired name must be lowercase and contain no spaces or special characters (only basic Latin and the ten numbers are allowed, abcdefghijklmnopqrstuvwxyz 1234567890). This will serve as both your auth name and your forum name. You can’t change it once you’ve registered, but you can slightly modify how your forum name is displayed: you can change the case and add spaces and some punctuation (. and -), i.e. you could turn jrandomnoob into J. Random-Noob.
Do not include your clan tag in your name, this can be attached separately if the group has been registered on the site and you’ve been added as a member. When registering a group you first have to enter its short name — this is simply a unique identifier, you can specify the full display name and tag(s) later. The short name of a group must conform to the same restrictions as a player name.
Your player name in the game is set separately and can be anything that fits into 20 character limit, but your auth name will be shown to everyone on the scoreboard next to your player name (except when you’re in spectator mode). There are currently no plans to change this.
To use the auth key, click on “log in” in the UrT main menu, and input the key in the box. Alternatively, you can use the console command auth-set <key> (on Windows and Linux, you should be able to simply paste the key with Ctrl+V (Shift+Insert if this fails)).
Using numpad to input the digits of the auth key will cause problems (for example, 7 inputs the digit and moves the cursor to the leftmost position, regardless of the Num Lock state).
Always use capital letters (A, not a) in the auth key, otherwise the key will not be valid even though it seems to consist of correct characters.
Should these methods fail, you can open the file named authkey, located in your UrT installation directory, and replace its contents with your auth key. If the file doesn’t exist, create it (see the configuration files section if you have trouble doing so).
There’s a thread on urtinfo that should answer all your questions regarding auth.
4.2 troubleshooting
Other troubleshooting resources:
![]() OS X game client (Quake3-UrT.app.zip) in 4.2.020 lacks file execution rights. See this post for how to fix this.
OS X game client (Quake3-UrT.app.zip) in 4.2.020 lacks file execution rights. See this post for how to fix this.
If you can’t download the game using the updater you find a ZIP with the full installation on the downloads page — just extract its contents and you’re set. Same goes for updating an existing installation, there’s a small update ZIP (answer “yes” when prompted to overwrite files).
If you find the sound horrible it’s because the dmaHD sound engine has been enabled by default in 4.2.017. You can turn it off by entering /dmaHD_enable 0 in the console, or in the settings menu (Setup → System → Sound). You may have to set the quality to 22 (/s_khz 22) to get the sound back to normal.
If the game quits with a blue console that says “VM_Create on UI failed” in the top row, you’re trying to connect to a server that runs a different point release of the game (for example, 4.2.014 connecting to 4.2.013 or vice versa). You have to either update your game or wait until the server owner updates theirs. Tip: if you’re authed, the game alerts you of it being outdated whenever you start it. (![]() This problem can also be caused by the 4.2.020 exploit fix.)
This problem can also be caused by the 4.2.020 exploit fix.)
If you drop back into main menu with “Hunk_Alloc failed on <number>” error, the game (more specifically, the map that was being loaded) needs more memory than allocated to it. 4.2, especially in the last two versions, uses more memory than 4.1 — seta com_hunkmegs “512” should fix these errors. (Setting the value higher than that can also cause issues, resulting in a “Hunk data failed to allocate <number> megs” error on game startup — com_hunkmegs is the amount of memory the game will request from the operating system, and if there’s not enough free, it will refuse to start.)
If the updater fails to start with the “Couldn’t find MSVCP100.dll” error, see this post.
If you get an “Invalid gamefolder” error when connecting to a seemingly valid 4.2 server of the proper subversion, you have an older client that doesn’t support the new (optional) pure list.5) Run the updater again or get an update ZIP from the link above. Remember, updating the official client doesn’t help if you’re actually using a custom one;-)
If your FOV (field of view) is off when watching demos, it’s caused by the new cg_demoFov cvar that ranges from 70 to 140. You probably want to set it to the same value as your cg_fov.
If you download the full ZIP and the download gets interrupted or the downloaded file is broken, you should get a download manager.
The Mac client and updater do not support PowerPC processors. There’s a relevant thread on the official forum, but since this has not given any results since August 2012, you can probably count this in the “do it yourself, or do without” category.
In 4.2, cl_guidserveruniq has been locked to 0, effectively making it useless for identifying clients (non-unique GUIDs mean that anyone who can see your GUID on their server can use this exact same GUID to spoof your identity on any other server). The Right Thing is to use auth instead.
“Could not create the assets folder (q3ut4). Please verify the user rights of this folder.” This seems to only happen on Mac. The updater has to be run from a location where it can write to, i.e. /Users/<your username>/.
If you can’t get a server list on Mac, it may be caused by outdated client binary (Quake3-UrT). See this post. If you updated the client when upgrading to .018 the cause is elsewhere.
The game crashes on launch on OS X Mavericks. A temporary fix is to enter seta r_ignorehwgamma “1” in the console.
If you use PeerBlock, auth is likely to fail: “Auth error: authserver not available”. You can unblock the auth connections (listed as OVH SAS using UDP) by right-clicking on a message in the list and selecting “Allow x.x.x.x permanently”.
4.1(.1)
- Frozen Sand does not support 4.1(.1) anymore and the page with download links has been taken down. A number of sites still host this version.
- The official support forum (locked and read-only since May 2013)
![]() Occasionally, when connecting to a server, you’d get an “invalid gamefolder” error message. This is usually caused by the differing versions of the server and your client — 4.1 server browser also shows all 4.2 servers (but not vice versa).
Occasionally, when connecting to a server, you’d get an “invalid gamefolder” error message. This is usually caused by the differing versions of the server and your client — 4.1 server browser also shows all 4.2 servers (but not vice versa).
4.1.1 is backwards-compatible with the previous 4.1 — you can play with it on older servers, but not vice versa. Both versions have active servers, although 4.1.1 greatly outnumbers 4.1 version (dswp.de older TDM aka <<<Wurst test serwer is running 4.1). The differences between these two versions are minor (4.1.1 is effectively a mappack — see the official news for description) and you should download 4.1.1.
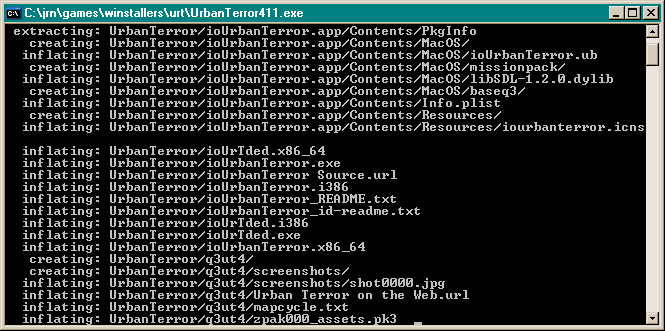
The only operating system–specific parts of Urban Terror are the client and server binaries (ioUrbanTerror), and all 4.x installers include Windows, Linux and Mac binaries, so there are only two installers available: ZIP, and Windows-specific EXE. The EXE however is not a real installer but a self-extracting archive — it doesn’t prompt you for install location, instead launching a command line window and sitting there for some time, unpacking stuff. ![]() If you do download the EXE, let the install process finish (it’s done when the “black window” closes) — threads complaining about the “Can’t load default.cfg” error caused by impatient people are all too common on the official forum. You can find the unpacked game folder (named
If you do download the EXE, let the install process finish (it’s done when the “black window” closes) — threads complaining about the “Can’t load default.cfg” error caused by impatient people are all too common on the official forum. You can find the unpacked game folder (named UrbanTerror) right where you ran the installer. Urban Terror does not use the Windows registry and you can extract/move the folder anywhere you want without breaking anything.
Installer unpacking the largest file, zpak000_assets.pk3:
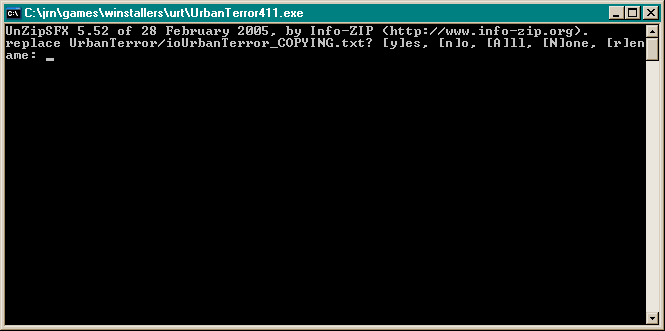
When running the installer for the second time (say, because you cancelled the first run and are trying again), you’ll see it asking whether it should overwrite the already-extracted files:
If you see this, close the command line window, delete the UrbanTerror folder, and then run the installer again.
Finding servers
![]() (This does not apply to 4.2 in any way.) The Frozen Sand master server for 4.1 was taken offline on January 1, 2014. You can still get a server list if you enter
(This does not apply to 4.2 in any way.) The Frozen Sand master server for 4.1 was taken offline on January 1, 2014. You can still get a server list if you enter seta cl_master "master.quake3arena.com" in the console or add it in your config. (This is the main Quake 3 Arena master all servers report to by default).
The built-in browser is capricious, to put it mildly, and should it fail with “No server list from the master server”, figuring out the reasons can be nigh impossible. Deleting servercache.dat (located where the game keeps its stuff) may help.
Various external server browsers may or may not show 4.2 servers, or fail altogether, due to changes made to the UrT master server behavior in order to phase out 4.1.
All the following programs allow you to set the path to your game installation and connect to a server in the list with a double-click.
4.2 only, OS-independent: The simplest way to find servers is using the official web list that allows you to filter the results by continent and exact game version, in addition to parameters like gamemode. Its main drawback is that being a pre-generated web page, it doesn’t show you pings. The icons in front of servers’ names are links that allow you to connect with a single click — using these requires having UrT Launcher installed and configured (pointed at your UrT installation).
4.1 and 4.2, Windows and Linux, open-source: UrTConnector (forum thread) is not maintained anymore and you have to first change the master server address in the options. To see 4.1 servers you have to use the Quake 3 master (see at the top of this section).
4.1 and 4.2, Windows, shareware: Qtracker supports many games natively (just tick the boxes you want). Uses its own master which apparently can’t be changed.
Although it does show 4.2 servers these are displayed with the vanilla Quake 3 icon and the game modes are messed up (4.1 modes are fine):
- 7 = CTF
- 8 = Bomb
- 9 = Jump
- Tournament = LMS
- Tournament Deathmatch = TDM
- Capture the Flag = TS
- FFA is displayed correctly; FTL and CAH are probably also shown with numbers (5 and 6, respectively)
4.2 only, Windows, open-source: Monster Browser (website) supports several Quake 3 mods and the list can be extended by editing the configuration file. The engine path in the settings window is for vanilla Quake 3 only, the location of your UrT (or whatever) client has to be set in the config file (the exePath=xxx line).
You can use rcon from the server list (and set and/or save a password for each server).
4.1 and 4.2, Mac, closed-source: Urban Server Picker (forum thread) shows both UrT versions in the same list. The master server address can be configured.
GUI & HUD
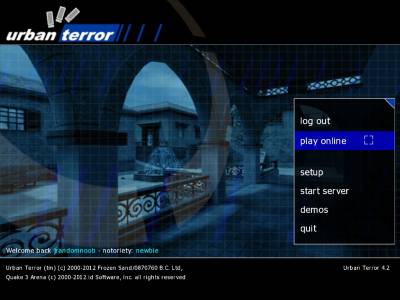
The main menu:
- log in/log out: along with the welcome message, it’s a 4.2-only feature. See the previous section for explanation.
- play online: opens the server browser that allows you to filter them by several criteria, connect to selected servers, and set them as favorites.
- setup: graphics and sound settings, keyboard & mouse customization, player character setup. Should you dislike the main menu music, you can turn it off here under System → Sound → Music Volume.
- start server: allows you to start a local server (by default, this is not accessible from the outside). In the 4.x versions, bots are buggy and not officially supported, so this option has limited use.
- demos: allows you to play back recorded demos. On a fresh installation, there’s only the tutorial demo available — do watch it.
- quit: exits the game (you can simply press Esc twice to get past the credit screens).
 By pressing Esc at any moment while playing, you can access the in-game menu (most setup options are available in both main and in-game menu):
- about: technical info about the server you’re currently playing on.
- player: player setup, team selection, gear selection
- stats: statistics about the players currently connected.
- controls: keyboard & mouse setup.
- options: most of the customization is done here.
- system: graphics and sound settings.
- votes: call a vote or vote yes/no for in a vote in progress (“yes” is by default bound to F1, “no” to F2).
- rcon: admin tools, useless for a normal player.
- exit: exit to main menu or quit the game altogether.
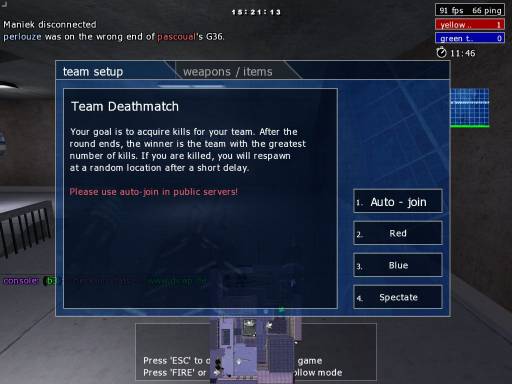
When connecting to a server, after the map loads, in most game modes you’ll be prompted with the team selection menu:
(You notice it suggests using the auto-join button. It’s a good advice.) You can access this menu at any time by pressing Esc, under player → team select.
In most game modes you can join the game at any moment you wish; only in TS, bomb and LMS you’ll have to wait until a new round starts (you can select a team, but this won’t have any effect beyond restricting who you can spectate). Unless the server is configured to do so, you will not be forced into game (except in FFA and jump). Some servers kick spectators after a set time; watch out for B3 warnings in the chat area.
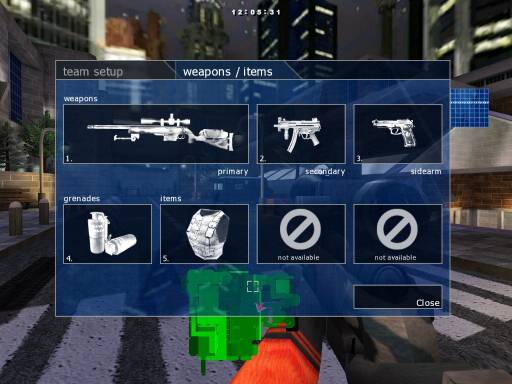
Selecting your weapon and item loadout is done under player → weapon / gear select. Each of the boxes represents a slot: possible equipment is restricted by these, and you can never fill all slots at once (the disabled ones are clearly marked as such). You have one primary weapon slot, one secondary weapon slot, one sidearm slot, grenades slot, and three item slots. The minimal allowed gear is primary, sidearm and one item in the first item slot. Even if your setup has no room for secondary and grenades, you can still pick them up from dead bodies. For more advanced loadout selection methods, see the gear cvar article (you’ll need to know about config files first).
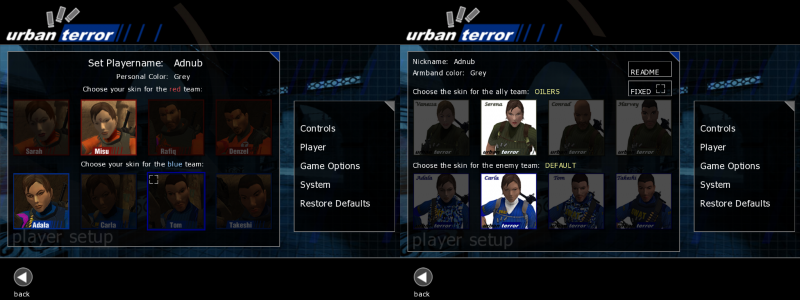
There are two models, male and female, and two skins for each per skin set. In 4.1(.1), there are only two team-restricted sets — orange for the red team, blue for the blue. The model selection cvars are racered and raceblue for team modes and racefree for FFA, LMS and jump modes, the valid values being in the frange from 0 to 3.
In 4.2, you choose skins for enemies and allies and the selection will stay the same even when you change teams; skins are purely client-side and your choice does not affect what others are seeing6).
If you change your skin selection while in-game, it will not take effect until you respawn or change team, except in jump mode (and you can change the skins on the fly while watching a demo). And yes, you can end up with the red team being blue and vice versa — to help lessen the confusion, all names in public chat messages are prefixed with “>” in the speaker’s “real” team color, and there are red and blue rectangles next to the team scores in the upper right corner. In FFA, LMS and jump modes, only the “enemy” skins are used. Servers can disable client-side selection, in which case the colors will be the default red and blue (servers can’t force arbitrary colors).
Starting with 4.2.016 you can lock the skin selection (the skins stay the same even if you change teams) with cg_skinFixed 1. Note that with fixed skins enabled the “ally” team in the skin selection menu is the blue team and the “enemy” red (the same logic applies when you’re spectating with relative skins enabled).
The skin selection cvars in 4.2 are cg_skinAlly and cg_skinEnemy, with the values being:
0 default (the “real” team color)
1 green
2 red
3 blue
4 purple
5 orange
6 olive
7 white
8 black
9 desert
10 cowboy
11 cavalry
12 droogs
13 Dr. Pink
14 Dr. Blue
Your personal color is displayed on your arm and leg bands, on the minimap arrows, and in the scoreboard and player list, allowing your teammates to identify you even when they can’t see your name. (Some servers disable personal colors, forcing everyone to wear their team color; a third option that’s effectively never used randomizes the colors.) You can choose colors other than those shown in the menu; see the customization article for more information.
Whenever you see someone with a hat, goggles, mask, horns or whatever, it’s something called funstuff — additional small models you can attach to your character. Funstuff does not require any modifications to your game and its use is completely free. There’s a more detailed article on the topic (including directions for disabling it).
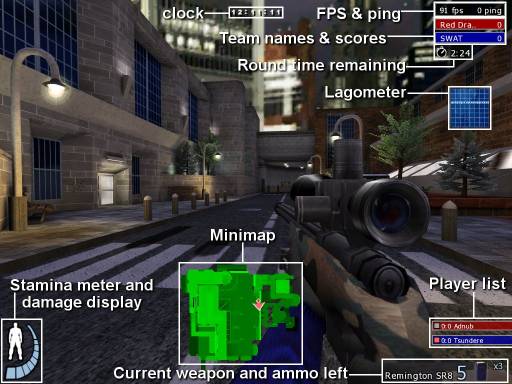
The HUD of Urban Terror:
The player list is commonly called “team overlay” or occasionally “mini-scoreboard”; you can customize its properties under options → Team Info Settings. There’s a handy script for toggling the state of the overlay.
The lagometer is a connection quality display: green represents your ping (the thinner and smoother the better), black bars in the green area represent ping flux, and pink swathes appear when you have packet loss.
On the minimap, each team mate is represented by an arrow in their personal color; the arrow points in the direction they’re looking. When you’re requesting a medic via the radio, your arrow flashes. Medics’ arrows have a little red cross at the tail. You can change the size, position and transparency of the map and the size of arrows under options → Minimap Settings.
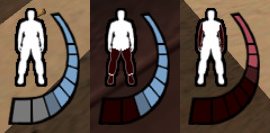 Stamina and damage indicators: the meter turns gray segment by segment the more you sprint or jump; if you get injured, the lost health/stamina is represented by dark red. When you bleed, the health blinks between your team color and dark red; there’s also periodic “blackout” effect with your view blotting with red every few seconds. The human figure shows the location of your injuries: legs, arms, torso or head wound(s).
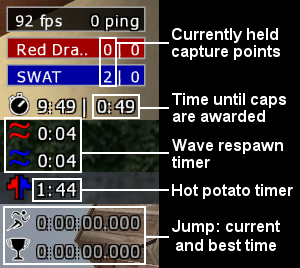 Depending on game mode and server setup, you may also see these timers:
- Top: Capture and Hold only, see the mode description.
- Middle: If wave respawns are enabled (only possible in TDM, CAH and CTF), all dead players respawn at the same time when the timer reaches zero. The hot potato timer is CTF-only.
- Bottom: Part of the jump mode is a stopwatch function that automatically remembers your best time.
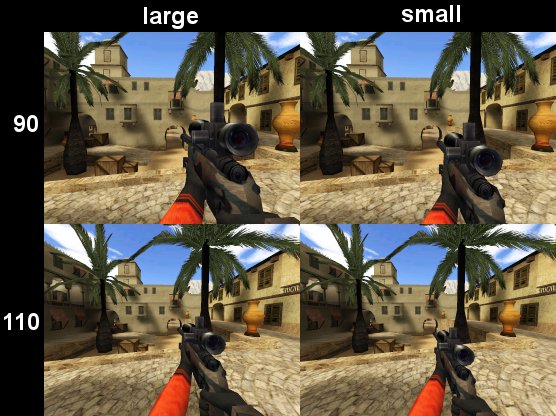
You can change your FOV (field of view) under options → General Settings, and change the weapon size under options → Gun Settings. A comparison of FOVs and gun sizes:
Note that on a widescreen the top and bottom of the displayed image are cropped (the FOV remains the same horizontally so that the additional space does not give you any advantage). This is the result of a design decision in the original Quake 3.
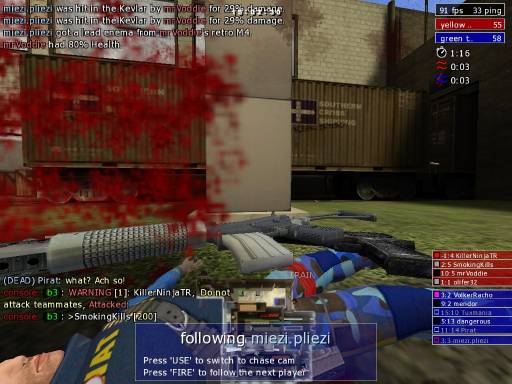
By default, different messages are separated on the screen:
Top rows show hit messages (only displayed to the attacker and the attackee) and death messages (displayed to everyone); the bottom rows are for chat and the text accompanying radio calls. You can change the display time and amount of rows under options → Chat Settings. Oldschool players can force the Quake 3 style chat + messages on top of the screen with cg_standardChat 1.
The main gameplay elements
Equipment
Due to large amount of specific data, this section has a separate article dedicated to it.
Movement
Climbing and ledge grabbing: Since the very first released beta, it has been possible to not just climb ladders, but to grab and climb any ledge you can reach. To do so, jump against an object while holding the forward key — keep it pressed, and your character will pull themself up. Ledge grabbing can also keep you from doing the lemming thing — grabbing anything while you’re falling will bring you to stop instantly with no damage whatsoever. Grabbing makes a distinctive sound.
Sprint is bound to E by default, a modifier key — you’ll have to hold this in addition to forward; the alternate “oldschool” method is to hold AWD7). Sprinting is noticably faster than simply running, but it also depletes your stamina. Sprinting is the best way to gain speed for jumps and slides. You can’t sprint in other directions or while swimming; sprint does speed up your movement while in spec.
Strafe and circle jumping: Although bunny hopping in straight line has no effect (or even a negative effect) on your speed, Quake-based games have strafe and circle jumping (the linked articles discuss Quake 3, not UrT, but the underlying theory is the same). What you need to know is that the maximum speed attainable in the game by running straight is limited (as are the strafe and backpedalling speeds), but it’s pretty easy to “abuse” the quasi-physics of the engine by moving in another direction in addition to forward, thus achieving noticably higher overall speed. Running on ground additionally limits the maximum speed with friction, but air does not have any friction, hence instead of strafe/circle running it makes sense to use respective jumping techniques. Due to the game having sprint, circle jumping is much more powerful in UrT than strafe jumping.
To circle jump, you’ll have to sprint (to gain the initial speed) and then continue jumping while keeping sprint pressed and moving your mouse left and right — the exact speed is less important than smoothness of the movement. The direction of turning can be used to affect your direction — turning more than 90° to the side can get you around corners even without walljumping.
Fun detail: when you move at speed over 600 Quake units per second, there will be a team-colored trail behind you. While useless in combat, this adds a bit of visual appeal to jump videos.
Kicking aka the boot of passion: once usable with every weapon and a good way to distract enemies while reloading, the boot is nowadays a special-purpose feature. You have to hold a knife, pistol or grenade to kick; a kick always hits “body” and does 20 damage. It’s most useful for moving blocking teammates out of doorways and such (you can’t kick them if friendly fire is disabled though).
Walljumping: Introduced in 3.5, this is essentially a variation of the boot of passion (kicking people by jumping against them). Walljumping allows you to scale obstacles faster than climbing over them would, gaining height to grab ledges that would be too tall otherwise, and gaining speed by kicking against a wall sideways. In certain situations, walljumping is also usable for jumping down from heights, though somewhat tricky. You can make three walljumps in a row before you have to touch a horizontal surface.
Goomba stomp: introduced in 4.0, this is probably the most difficult way to kill someone: if you’re falling from a height where you’d break your legs or die altogether and you land on someone else’s head, you kill them instantly. As you can imagine, accidental teamkills are more likely to happen than deliberate kills.
Powerslide: Sliding (introduced in 4.0) is useful for bridging gaps between jumps, fitting through doors and tunnels, and speeding out from behind the corner — once you’re sliding, it doesn’t really matter which way you are facing, so you can aim at the most likely threat direction. Sliding also allows you to move fast with broken legs — you can jump down from a height and slide while bandaging or shooting until you’re covered or reach your destination.
Swimming: When underwater, you have 16 seconds’ worth of breath (replenished instantly when you surface), and it takes 8 seconds from starting to drown to dying.
Stamina management: The only actions using stamina are sprinting, jumping and crouching (more precisely, only crouching down, not standing up); walking, running, climbing and swimming are free (however, your stamina won’t refill while you’re in the water). Although some people claim that crouching helps you to regain stamina faster, this is not true.
Other
Bleeding, bandaging and healing (medding): All wounds except for hits in kevlar vest and helmet will bleed8), losing about 5% health per second. While bleeding, you leave a blood trail and make noise every few seconds; at the same time, your view will suffer from “blackout” effect and your aim will jerk. Bleeding or health level does not affect your speed (except for leg wounds), but since your stamina is equal to your health, your top speed / time you can sprint is lowered.
Every player is capable of bandaging themself and other players (including the enemies) which only stops bleeding; bandaging also fixes legs that are broken due to a fall. If you’re carrying a medkit, it’s possible to heal other players (if you don’t carry one, but your patient does, you still can heal them, but at noticably slower rate). You can bandage and heal while swimming or climbing a ladder. Healing makes distinctive sound and blocks your actions for a short amount of time, so mind where you do this. Two (three, …) people healing someone make the process two (three, …) times faster.
Ancient ninja techniques
- A unique feature of Urban Terror is the ability to cancel the cooking process (timer) of a grenade (you “put the pin back in” and the nade is as good as new) by switching to another weapon. In 3.x and earlier versions, switching weapons in this situation resulted in the nade dropping at your feet and exploding anyway, but someone screwed up something in the code of 4.0. It’s a kind of an ascended bug: nobody has ever re-coded this properly, but unlike the SR-8 drop exploit, re-cooking nades is a recognized and allowed technique everywhere.
 Beware: if you throw a nade, immediately cook another, and then switch weapons, the nade will behave exactly the same as in earlier versions.
 - You can perform some of the actions simultaneously — reload while bandaging or climbing, bandage while climbing — but only if started in the right order:
bandage → reload → climb - You can minimize your visibility behind cover by “turtling” — crouching and looking down9). This has very limited use though, since your reaction time and ability to spot threats suffer badly. It can be life-saving when you’re bleeding and out of ammo — both bandaging and reloading turn you into a sitting duck anyway.
- Theres no need to turn around to close doors behind you — running at full tilt and pressing the use key again just after you’ve passed through saves precious time and may save your life.
- Players who are right next to a thin brush (less than 16 qu10), usually this means doors and windows) clip into it and can be shot from the other side (they’re only visible through the brush if it’s less than 8 qu thick). This is what happens at the infamous “noob trap” on Uptown — the laundromat window is bulletproof, but newcomers trying to open it often end up dead and very confused.
- If you’re wearing vest and lost a lot of health, it’s best to drop the vest — if a single LR300 hit in the vest would kill you anyway then its protective factor is zero, but you can always use the extra stamina.
Game modes
Official
FFA (Free for All) (g_gametype 0)
The “kill everything that moves” mode; while one of the most common modes in Quake 3, it’s rarely seen in UrT.
LMS (Last Man Standing) (4.2 only) (g_gametype 1)
FFA patterned after team survivor.
TDM (Team Deathmatch) (g_gametype 3)
One of the most common modes for public servers, considered the epitome of noobishness by pretty much everyone.
TS (Team Survivor) (g_gametype 4)
TS is the competitive mode in UrT and more popular in public servers than TDM or CTF. It’s regarded as the slowest mode among those that are commonly played; competitive players split quite neatly along the TS/CTF divide where each side considers the other tactics-free mindless rushing / boring cowardly camping, respectively. Since the spawns in this mode are usually semi-random (most good maps have multiple spawn groups in matched pairs and a particular group is not restricted to red or blue only), matches are played without swapping sides. Team survivor gear has the least variation: typically helmet (or medkit), vest, nades, LR300 (or occasionally SR8) and Deagle.
FTL (Follow the Leader) (g_gametype 5)
Similar to CTF, but only the team leader can score a cap (they’re shown with a blinking arrow on the minimap). Being one of the oldest modes, FTL has remained strikingly unpopular, having only a few nigh-empty servers at any given moment.
CaH (Capture and Hold) (g_gametype 6)
There are usually one to six capture points (represented by gray flags); touching one claims it for your team. Every x seconds (default 60) the teams get awarded a point for every flag they currently hold and the flags revert back to neutral.
CTF (Capture the Flag) (g_gametype 7)
CTF is the other main competitive mode for UrT. This mode has both teams attempting to bring the enemy flag to theirs (capturing aka capping) in order to score; you can also get points for things like killing the flag carrier, returning the taken flag and simply being in the scoring team. A flag that has been dropped (either deliberately or because the carrier died) will return after a short set time with no points added or deduced for neither team.
When a flag is taken, dropped or returned, a message is shown to everyone on the server and an event-specific sound played globally; while a flag is away, the name of the team this flag belongs to will blink in the right upper corner of the screen. When both flags are away, the “hot potato” timer starts ticking; when it reaches zero, both flags explode (killing the carrier if not dropped beforehand) and return. This feature was introduced to get rid of the long boring standoffs.
In the European competitive scene, wave respawns are used (all dead players spawn at the same time every x seconds), making the gameplay rotate around timers. In higher divisions, timer awareness can lead to entertaining scenes where one of the two duelling players stops shooting to get killed at the best moment, and their opponent does the same to kill the foe at the worst moment. Using wave respawns has led to creative abuse of teamkilling: when you see a team mate you’d normally heal and the timer is nearing zero, you can simply kill them and avoid the slow healing process altogether (doing /kill in the console is punished with double respawn delay, so you’ll either have to hope for a teamkill or step on a nade). While recognized and allowed technique in matches, teamkilling is still considered a bit of a bad form by some and there are various suggestions to make it useless.
You should be careful with using teamkilling on public servers: usually the ones that have friendly fire enabled also have TK limits, and many of the players may not understand your behavior either.
In the North American scene, standard delay-based respawn is used and medics are much more common. In competitive play (matchmode), the matches are played in two halves, teams being switched after the first one.
Flag is considered an item and you can drop it with ut_itemdrop flag (or by selecting the flag with the item keys and dropping it with a generic bind).
Bomb (g_gametype 8)
![]() We have weekly bomb nights — connect dswp.de:22223 @ Sunday 20:00 CEST.
We have weekly bomb nights — connect dswp.de:22223 @ Sunday 20:00 CEST.
This is essentially the same as bomb mode in Counter-Strike: the red team has to plant the bomb in one of the two bomb spots (named “red” for A and “black” for B) while blue has to stop them. Bomb is typically played in two halves even on public servers; in matchmode, each half usually consists of 10 rounds which are time limited. As in TS, there are two timers: match or half timer on the left and round timer on the right side.
A round can be won by the red team by either killing everyone in the opposite team in the given time, or successfully blowing up one of the two targets (bombsites). To win a round as the blue team, you must keep the reds from planting the bomb in the given time or defuse it if it has been planted (done with the use key, Ctrl/Strg by default). If the bomb has not been planted the blue team can either try to kill everyone from the red team or just survive until the time for the round has expired (remember this only works if the bomb has not been planted yet).
Planting/defusing the bomb: Bomb bag is considered a weapon, by default accessible with 6 or scrolling through the weapons with the mouse wheel, and can be dropped with ut_weapdrop. The planting is done with the fire button (left mouse button); once you have started the planting process you can’t move or switch weapons until it’s finished. In UrT, you can only plant right on the bomb spot — no hiding the bomb in the corners of the bombsite. Bomb spots are visible on both your minimap and in-game as animated targets11).
Tips:
- The time which is needed for the bomb to explode is usually 40 seconds and the time to defuse is 10 seconds, but be aware that this varies from server to server!
- Killing the bomb carrier gives you extra points, as well as killing the planter or defuser.
- When playing as red, following the bomb carrier is a good idea to start the round.
- Camping might not be nice but it is not unusual to do this to protect the planted bomb as the red team or protect a bomb spot as the blue team.
- Communicating by using the radio really helps!
- If you have autoradio enabled, some additional calls are played in bomb mode. The bomb carrier says “I’ve got the bomb” at the start of the round, and “I’m planting the bomb” when planting; starting a defuse will play “Defusing, cover me”.
![]() Check out Bagheeras bomb-tutorial for more Information
Check out Bagheeras bomb-tutorial for more Information ![]()
Jump (4.2 only) (g_gametype 9)
Jump is the defrag/race mode of UrT. In 4.1(.1), there’s no support for timers or anything like that and typically the jump servers run in CTF, with “jump” in the server name. There’s no competitive jumping scene, but a dedicated jumping community does exist.
The 4.2 version has a jump mode (g_gametype 9) since .006; as of .012, it includes timers, nodamage, stamina regain (nostamina being a server-side option), arbitrary walljump limit, saving and loading positions, and matchmode. Mappers can place timer start, stop and cancel entities and add colored paths to their maps (so far no maps utilizing these features have been released, although several existing ones are being updated). To activate or deactivate the timer, you have to type ready in the console. Due to its history, 4.2 jump mode supports flags that anyone can take and cap.
Jump mode features:
- ghosting, or the ability to walk through other players, enabled client-side with
cg_ghost 112) - persistent server-side location saves (needs to be enabled server-side with
g_persistentPositions 1; the client commands aresaveandload, the saved location being available for reloading even after you disconnect and reconnect) - goto, or the ability to teleport another player’s location (needs to be enabled server-side with
g_allowgoto 1; the player you’re targeting has to enable got for themselves withallowgoto 1, after which you can teleport to them withgoto <slot number>).
UrT jumping does not use any weapons (although there are HK69 & HE nades, and even in 4.1 jump servers generally have damage disabled); instead, players rely on walljumping to gain height and speed in a similar manner. Most maps have nodamage floors and/or surfaces that teleport you back to the start of the particular jump (not the start of the map); only a few maps like Deathjumps: Hell kill you on the first mistake. For those who find that friction is for noobs, there are various icy maps available, where all the jumps require running on a rather uncooperative surface.
FT (Freeze Tag) (4.2 only) (g_gametype 10)
This is basically a version of Team Survivor where death is reversible. In order to win, your team has to ensure that all opponents are frozen at the same time; this is made harder by the ability to thaw teammates by standing next to them (frozen players also slowly thaw on their own). Unless healed during thawing, freshly thawed/melted players only have 10% of health. Thawing someone gives you a point just like freezing does. Suicides (including /kill, ’sploding and lemmings) do not freeze but kill.
The first version of FT in .019 differed significantly from the 4.1 server mod in that frozen players weren’t affected by gravity or damage, meaning they would remain stuck in the air and you couldn’t boot or shoot them to keep them from thawing. This has been changed in .020 (but you still can’t look around while frozen).
FT uses Team Survivor spawns, but the map layout is the default (TDM) one, unless the map maker has updated it with arrangements for gametype 10.
Unofficial
![]() This entry does not discuss any Urban Terror mods (the most famous of them being the zombie mod) that make changes to the gamecode. You can Google for these (note that Frozen Sand refuses to allow any mods-related discussion on their forum).
This entry does not discuss any Urban Terror mods (the most famous of them being the zombie mod) that make changes to the gamecode. You can Google for these (note that Frozen Sand refuses to allow any mods-related discussion on their forum).
Skeet shooting
Red team (ten to twenty bots, normally unarmed) are skeet, constantly respawning on jump pads; blue are shooting at them from a closed balcony or platform. Newer maps have nifty reloading stations that allow you to carry much more ammo than it’s possible in normal gameplay. Skeet servers run in TDM mode, which means scoring is straightforward: every kill gives one point.
Urban Zone holds sort-kinda annual Skeet Shoot Tournaments, each having been created a new map for it.
Assault
Developed by Asche and Holblin, this utilizes special stage-based maps where capturing a point unlocks the next one. One team is attacking and capturing, the other one defending. There are currently only a few maps available, but both Asche and Holblin are now members of Frozen Sand and the assault mode will be part of UrT HD.
Deathrun
This is another map-based mode: one team has only knives and are locked in a control room where they can activate various death traps the other team has to avoid to reach and kill them. Most of the map names for this mode start with “ut4_deathrun_”.
Talking to other players
In 4.2, you can ignore anyone’s chat and radio messages. Type /playerlist in the console to find the slot number of the annoying person, and then /ignore <number>. You can see the currently ignored people with /ignorelist. The ignore feature is not persistent (does not use the player accounts) — a slot will be automatically un-ignored when either the ignoree or ignorer leaves the server.
Chat
There are four chat modes, global, team, target and PM (private message), the first two being bound to T and Y by default.
| type | bind command | script command | behavior |
|---|---|---|---|
| global chat | messagemode | say | shown to everyone |
| team chat | messagemode2 | say_team | shown only to your teammates |
| target chat | messagemode3 | tell_target | shown only to the person under your crosshair |
| PM | tell <slot number> | shown only to the person you’ve specified |
“Bind command” is what you’d bind to a key — you press the key for chat prompt, type your text, hit Enter. The default keys for normal and team chat are T and Y. messagemode3 only works if there is someone under your crosshair; PMs cannot be bound like this13).
“Script command” is what you’d use in console and in scripts — /say y'all so ghei or bind q "+button6; say_team Bandaging @ $location". The latter would cause you to spam this line to your teammates every time you bandage someone. (As always, think through what’s necessary and what not; useless spamming is a good way to get yourself kicked on many servers.) See “Basic scripting” below for explanation and usage.
In FFA, all chat is forced global. In team-based modes, the configuration of a particular server may force all chat to be teamchat; in round-based gamemodes (TS & bomb) it’s common to disallow chat for dead players. Spectators’ chat is always visible to spectators only, except in 4.2 jump mode where everyone sees everyone.
You can only use basic ASCII/ANSI symbols in chat; if you use say ä or ², these will be replaced with period. Some characters (~, ", //, %, ^, $) have meta meaning and will either be replaced with space or cause the next word to disappear altogether (e.g., unknown words patterned like $macros are discarded).
While in global chat everything is displayed in yellow, team chat, target chat and radio messages are white and can be colorized by using the Quake color codes.
- ^0 or ^8 black (in UrT it’s actually just the empty letter outlines)
- ^1 red
- ^2 green
- ^3 yellow (the default text color; use it after any highlighted bit)
- ^4 blue
- ^5 cyan
- ^6 magenta
- ^7 white
Example: ^1the ^2gaily ^3colored ^4example ^5string ^6for ^7the ^8wiki results in
Radio
Radio is a menu-driven interface for playing predefined voice messages, by default accessible by pressing U and then number keys according to the menus. There’s a dedicated article on using, binding and customizing the commands.
Recording and watching demos
Demos are recordings of the game events — everything that is streamed to you when you’re playing on a server (people playing, their movement, hits, radio messages, chat) gets written in the file. Demos are not videos — see “Turning demos into videos” below about how to do that.
By default, the key for starting and stopping demos is F12; while recording, there’s a text shown at the top of the screen. By default, demos have names in the format of <year>_<month>_<day>_<hours>_<minutes>_<seconds>_<your current nickname>_<current map>_<current gamemode>.dm_68. You can change this by recording manually with the command /record <desired name>; stop the demo with /stoprecord. Usually, you’re better off with F12 and renaming the files later if needed.
![]() Beware: If you quit the game while recording, the state of F12 will “stick” so that next time you’ll have to press it twice to start recording. Always check for the “RECORDING” text; if you can’t see it, you’re not recording.
Beware: If you quit the game while recording, the state of F12 will “stick” so that next time you’ll have to press it twice to start recording. Always check for the “RECORDING” text; if you can’t see it, you’re not recording.
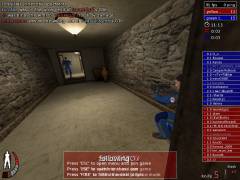 To spectate someone, you can simply click through the players (by default left mouse button, or whatever you happen to use for shooting), but on a large-ish server like DSWP TDM this is time-consuming. Use /playerlist, find the slot number next to the player’s name you’re interested in, and do /follow <number>. Funny bug: If you do /follow while not speccing someone (floating freely), you’ll see people having no hands and no weapon in first person view. To fix this, press Ctrl twice for free-floating mode again, press left mouse button to spec anyone, and then do /follow again.
To view a demo, use the built-in demo browser (demos in the main menu) to locate the file you need. This browser however has serious limitations, most importantly, when the amount of demos exceeds a certain limit, the ones with alphabetically earlier names will not be displayed (if you have large-ish amount of demos with actual names, the automatically-named ones won’t be visible).
On Linux, you’ll probably have to rename demos to all-caps (demoname.dm_68 to DEMONAME.dm_68) before you can watch them. For more comfortable demo playback, see the “Software” section below. In case you want to change the demo playback speed (useful for watching aimbot demos), see this post.
If you can’t load the demo (error message “Couldn’t load maps/ut4_xxx.bsp”), you lack the particular map the demo was recorded on. The quickest way to fix this is to point your browser at our map server and append the map’s name (ut4_xxx.bsp) to the address on the title bar, with BSP replaced with PK3. Download the map and save it in q3ut4 folder of your UrT installation. Alternatively, there are many sites hosting UrT maps; quick Google search with the map name put between quotes usually gives you a download location. ![]() Based on hearsay, some browsers on some systems may save the map with a ZIP extension instead of PK3 so you’d have to rename it before you could use it.
Based on hearsay, some browsers on some systems may save the map with a ZIP extension instead of PK3 so you’d have to rename it before you could use it.
If you experience horrible lag when playing back a demo (that goes away when you speed the playback up and then slow to normal again), it’s probably caused by ut_timenudge. The only known fix is setting it to 0.
Demo playback has an interesting failure mode: if you have UrT 4.1.114), you can play and record on 4.1 servers (such as DSWP) just fine, but when playing back the demo, weird things can occur — up to and including dropping back into the main menu with an error message (CM_InlineModel: bad number). The reason is that some maps were updated for 4.1.1 while retaining exactly the same name — and when you’re playing back a demo recorded on the previous version of the map, data in the demo and structure of the map will clash.
The affected maps are Casa, Harbortown, Ramelle, Ricochet, Subway, Swim (The Bath), Thingley, Tombs and Uptown. (Some of the new maps in 4.1.1 started out as custom maps and you may run into the same problems with them in case the standalone version and the 4.1.1 version have any differences.)
To view 4.1 demos on 4.1.1, you have to temporarily rename or move zpak001_assets.pk3; there’s currently no other way. Linux users can use Pirat’s playdemo script (see the next section) that automatically takes care of this.
Occasionally you may see how the viewpoint player in the demo suddenly starts moving in a straight line, going through walls and whatever. This is not some kind of cheat; the person recording had CI (connection interrupted), a state where no information can move to and from the server for a noticable amount of time. While online, this looks like everyone stopping for a few seconds and then snapping to different locations; when playing back a demo, the game interprets straight constant-speed movement between points right before and right after CI.
Software for easier demo playback
 Jacepriester from .net has created a demo launcher (urtinfo forum thread) that works with both .dm_68 and .urtdemo files and can launch a demo from a subfolder (creating a temporary copy). You can read all metadata (server cvars, players, scores, events, chat) in the selected file and save it as .txt or color-coded .rtf. Note: this program does not associate file extensions, it indexes all demos in the location you’ve set for the game(s) and you launch a demo from its list. A Linux version is planned (the Windows version runs under Wine), Mac version uncertain.
An older program, UrT Demo Loader by 1UP clan, is a very basic launcher. It associates the .dm_68 extension with itself so that you can double-click on any demo file in the file manager, and the loader will start Urban Terror with it. This also allows you to organize your demos easily — since you can launch a demo from anywhere, you can collect different demos into different folders. (Note: the limitations of UrT mean that when you start a demo that is not located in q3ut4\demos, the loader actually creates a copy of the demo there and the game will play this copy.) If you want to use this to play .urtdemo files you can associate the extension manually: right-click on demo, Open (With), and select the launcher (tick “Always use the selected program to open this kind of file”).
Linux: playdemo, written by Pirat, allows you to play any demo located anywhere. It also removes the need to rename demos to all-caps. For sniffing whether it’s a 4.1 or 4.1.1 demo, there’s demo file analyzer.
Location of maps, configs, demos and screenshots
The folder structure of Urban Terror is exactly the same as in Quake III Arena, just the base folder is q3ut4 instead of baseq3. Configs are saved in the base folder, everything else in their respective subfolders (q3ut4/demos/ for demos etc). Starting with 4.2.020, autodownloaded maps are saved in a subfolder named download.
- On Windows (pre-Vista), everything is located in the UrT installation folder (UrbanTerror\q3ut4\).
- On Windows Vista and 7, security-related changes made it impossible for programs to write in their installation folder (like C:\Program Files\UrbanTerror\); if you don’t find any demos or your changes to the config files don’t work, the real things are most likely located in C:\Users\<your username>\AppData\Local\VirtualStore\UrbanTerror\q3ut4\. In case you want to keep Windows from using VirtualStore, see this post.
- On Linux and other common Unixes, everything is kept in a tidy dot directory — /home/<your username>/.q3a/q3ut4/. You may have to turn on displaying hidden files in your file manager to reach this.
- On OS X, the most likely location is /Users/<your username>/Library/ApplicationSupport/Quake3/q3ut4/. (According to KarlMariaSeeberg, on Lion and Mountain Lion you first have to unhide the Library folder.)
Console
Console is used to input commands and set variables in-game; it’s mostly equivalent to changing values in config files. Everything typed into the console must be preceded by / or \, otherwise the string will be output as global chat (the opposite is not true: you can’t type /commands into the chat). The console is hard-bound to the “tilde key” which on non-US keyboards is most commonly `, ^ or some other diacritic, usually located right below Esc. (You can bind the console to something else in addition to the default, but the tilde key cannot be assigned to anything else.) If all else fails, Shift+Esc will do the trick. To force the console open without any delay, use scr_conspeed 9999. You can scroll up and down in the console using the PgUp and PgDn keys, or the mouse wheel (when scrolled up even by a single line, the console contents stop moving so you can read them easily). As usual, there’s console history: you can avoid retyping a previous command by flipping through them using up and down arrow keys. In UrT, console history is persistent (you can close the game, start it up again, and the previously-used commands will still be there).

![]() Occasionally it appears the console is totally empty when you open it. However, the line of red carets visible means the console is simply scrolled to the top; hit Ctrl+End to get back to the last line.
Occasionally it appears the console is totally empty when you open it. However, the line of red carets visible means the console is simply scrolled to the top; hit Ctrl+End to get back to the last line.
To save the console contents to a file, use condump <filename>. Note that on the vanilla client there’s a pretty strict limit to how much text the console can hold and condump can save. If you wan’t to be sure every event in the console gets saved, enable logfile in your server.cfg (logfile 2). ![]() qconsole.log doesn’t record echoes or other output that other players can’t see (like the output of
qconsole.log doesn’t record echoes or other output that other players can’t see (like the output of cvarlist).
Useful command for updating your settings without restarting the game after you’ve changed something in the config is exec <filename> (the file must have CFG extension, but you can omit the extension in the command itself).
Configuration files
For location of the config files, see the respective section.
You always have the main config file, q3config.cfg; this file gets overwritten every time you run UrT, so you don’t want to add your scripts there (changing the existing values after you’ve shut down the game is OK though). To customize UrT further, you’ll need to create autoexec.cfg that will get automatically executed every time and has precedence over q3config — if a value is different in q3config and autoexec, the one from the latter gets applied.
These config files are plain text in ASCII/ANSI encoding; the default text editor of your system (Notepad, Emacs, vi, gedit, Kate) will be able to handle this just fine. Do not edit config files with a word processor (Word, Write): the most likely result is a screwed up file. If you have problems creating a file with CFG extension or you can’t see the extensions, you can make a copy of q3config.cfg, rename it, open it and delete the contents.
Using the 4.1 vanilla client a single config file can be 64 kB at most; should you ever need to get around this, you can split your config into several files that are executed via commands in autoexec: exec <filename>.cfg for each file. (This method is also useful for separating different settings — like binds, scripts, system options and gamemode-specific setups — for clearer overview.) If you have an excessive amount of scripts, UrT may crash with MAX_CVARS error: you’d either have to reduce the amount of variables or use some other client (see the Alternate clients section for a list).
When you start the game q3onfig.cfg is loaded first and autoexec.cfg second. If any of the entries differ the one in autoexec.cfg takes precedence. Note the wording: “entries differ”. If you delete or comment out a bind in your autoexec.cfg it will still be loaded from the q3config.cfg because there’s nothing in the autoexec.cfg to overwrite it; if a bind is loaded on startup it will of course be written back on shutdown. If you want to ensure that a key is definitely unbound by your autoexec.cfg you should bind it to empty value (bind x ””). It’s a good idea to go through your q3config.cfg every now and then and delete old garbage that inevitably accumulates if you try out new things.
Setting a variable in the config file is done with set <cvar> "<value>". It’s a good practice to always use this format; while “set” can be omitted, double quotes are required in some cases. To force a cvar being written to q3config.cfg when you change it, use seta.
Binding keys and buttons is done with bind <key> +<action>. If you want to bind something to a key you don’t know the name for, use a workaround: bind something to this key via the in-game menu, open q3config and find the relevant line. ![]() Most actions are performed on keypress and stopped when the key is released (shooting only while you hold the mouse button etc). The plus sign is important; if you omit it, the action will never get reset (you’ll shoot until the ammo runs out, and then continue empty clicking.) Should you ever run into this problem, you can cancel the action via the console, by typing
Most actions are performed on keypress and stopped when the key is released (shooting only while you hold the mouse button etc). The plus sign is important; if you omit it, the action will never get reset (you’ll shoot until the ammo runs out, and then continue empty clicking.) Should you ever run into this problem, you can cancel the action via the console, by typing /-<action>. See the next section for more advanced + and - use.
Using the vanilla client, you can bind MOUSE4 (or aux1) only if you have in_mouse 1 enabled (you’ll need to do in_restart for it to take effect if you type this into the console). Binding MOUSE5 (or aux2) or scroll wheel tilt is not possible with the vanilla client; you’ll either have to use an alternate client or rebind them to keyboard keys using either the software installed with the mouse driver (if applicable) or some dedicated remapping program. You can’t bind Esc and “tilde” key (the key right below Esc) to anything else. On layouts with AltGr, UrT may read this key as Ctrl. When using non-US layout on Windows, beware that the vanilla client will use the values corresponding to the US layout (AZERTY users would have to press A although bandage is bound to Q etc15)).
Partial list of the keys and buttons (most of the other keys use the values you see printed on them):
| MOUSE1, MOUSE2, MOUSE3 | left & right mouse button16), middle button / scroll wheel click |
|---|---|
| MWHEELUP, MWHEELDOWN | scroll wheel up & down |
| INS, HOME, PGUP | Insert, Home, Page Up |
| DEL, END, PGDN | Delete, End, Page Down |
| Print Screen17) | |
| 0x00 | Scroll Lock |
| TAB | Tab aka the →| key |
| CAPSLOCK | Caps Lock |
| UPARROW, DOWNARROW, LEFTARROW, RIGHTARROW | arrow keys |
| SEMICOLON | ; on US keyboard |
| KP_ | all numpad keys are prefixed with KP_, as in KP_SLASH. All keys use their “Num Lock off” values; 5 is KP_5, Num Lock itself KP_NUMLOCK. On the vanilla client, KP_STAR is not recognized, you’ll have to use * instead. |
While you’d be able to find the names of most of the actions by skimming the config file (+attack for firing the weapon is pretty obvious), some of the actions have nonsensical and/or opaque names. This is a partial list:
| +button3 | fire mode (auto, burst, semi) |
|---|---|
| +button5 | reload |
| +button6 | bandage/heal |
| +button7 | use (also switches between first person, third person, and free-floating while in spec) |
| +button8 | sprint |
| +button12 | from the 3.5 README: *** forgotten feature *** if you put maptoggle on 0 you can bind a key to button12 (like bind j +button12) that'll only display the minimap so long as its held down |
| +speed | walk (UrT has “always run” turned on by default) |
| messagemode | global chat |
| messagemode2 | team chat |
Basic scripting
Scripts, although limited, are very common in all Quake-based games: in UrT, even the demo recording and stopping (F12 key) uses a simple script (with some of the problems this causes).
A basic script would be as follows:
bind x "vstr do_stuff"
set do_stuff "vstr do_stuff_on"
set do_stuff_on "ut_echo doing stuff; set do_stuff vstr do_stuff_off"
set do_stuff_off "ut_echo not doing stuff; set do_stuff vstr do_stuff_on"
Bound to X, this echoes “doing stuff” when you first press the key, and “not doing stuff” on the next press; after that, the cycle starts from the beginning. You can have near-arbitrary amount of different variables, your main worry being ensuring that each one would point to the next one:-P
Explanation of what does what:
vstr instructs the game to execute the contents of a variable18).
do_stuff is an intermediary variable whose contents are to be changed at will: you notice that both lines after that set do_stuff to something else (it’s initially set to execute the first variable, otherwise the script would not work).
On key press, do_stuff gets executed and in turn immediately executes the first variable (do_stuff_on); the first variable, when executed, echoes the string and sets do_stuff to execute do_stuff_off. do_stuff_off echoes its own string and sets do_stuff to execute the first variable, do_stuff_on again, completing the circle. All possible scripts, however complicated, use the same basic technique; if you can follow this explanation, you should be able to customize any script you come across.
A variation of vstr is +vstr that executes something on key press and something else on key release:
bind x "+vstr do_stuff_on do_stuff_off"
A limitation of +vstr is that if you call another vstr via one of the variables, the second argument to +vstr won’t get executed.
Beware that scripting in Quake 3 / Urban Terror is full of edge cases and the limitations offer nasty surprises; for example, to make a “hold to zoom” bind, you’d have to do this:
bind x "+vstr zoominonce zoomout"
set zoominonce "vstr zoomin"
set nothing ""
set zoomin "ut_zoomin; set zoominonce vstr nothing"
set zoomout "ut_zoomreset; set zoominonce vstr zoomin"
The empty nothing ensures that the rifle won’t continue zooming in when you hold the key. Quite easy solution.
However, the seemingly simple script that would allow you to zoom in and out with the same key:
bind x "vstr zoominout"
set zoominout "vstr zoomin"
set zoomin "ut_zoomin; set zoominout vstr zoomout"
set zoomout "ut_zoomreset; set zoominout vstr zoomin"
would mean that every time you die while scoped in, after respawning you’d have to press the zoom key twice to actually zoom in — the state stored in zoominout cannot be reset when you die. If you have more than one or two of such sticky scripts, it would make sense to bind a special key for resetting all of them at once, to be hit whenever you respawn.
Feedback in scripts
ut_echo is a command that outputs a local message on the screen (upper left corner; only you can see it), useful for feedback. You can use colors in echoes the same way as in chat.
For more feedback options, you can use sound: for example, by default the screenshot key (F11) has following bound to it:
bind F11 "play sound/misc/kcaction.wav;screenshotjpeg;ut_echo ^1Screenshot^7 taken."
Sound files are referred to by using their paths starting from the PK3s (these can all be considered one amorphous blob for our purposes): sound/misc/kcaction.wav = UrbanTerror/q3ut4/zpak000_assets.pk3/sound/misc/kcaction.wav. You can play any sound you have in any of the PK3s, whether standard files, custom maps, or something you’ve added yourself.
Alternate clients
The vanilla client (named ioUrbanTerror in 4.1(.1), Quake3-UrT in 4.2) is a version of 2007 ioquake3, with some minor code changes (for example, the base folder is set to q3ut4 instead of baseq3, ensuring you don’t have to pass the fs_game parameter when launching the game). Although it’s the most stable client for most people, it lacks some of the features introduced into ioquake3 after 4.0 release; it also has no advanced rendering capabilities whatsoever.
Below is a partial list of clients that can be used to run Urban Terror. Important for Windows users: most of these clients do not save their configs, demos and screenshots in the UrbanTerror folder; to force the old behavior, add +set fs_homepath <path> (like +set fs_homepath C:\Games\UrbanTerror).
For 4.1(.1):
- UrT can still be run as Quake 3 mod (or by simply using its binary); however, this is the least appealing solution.
- Ikalizer is a version of ioUrT with a different sound engine, intended to give better spatial representation of sounds.
- dmaHD build is a similar project to Ikalizer. Also supports larger configs and more mouse buttons.
- Mitsubishi’s build aka the optimized .exe is the kitchen sink client including Ikalizer, dmaHD, better mouse input, more supported buttons/keys, larger config size, and fancy rendering options from the bumpy binary. (The Google Translate–related options do not work anymore though: Google turned off the free API in December 2011.)
- SACC aka Slackin’s Advanced Competitive Client has various cvars for fine-tuning your connection.
For 4.2:
- You can still use the 4.1(.1) client (ioUrbanTerror), or even vanilla Quake 3, to play 4.2 online; however, this will not allow you to use auth, and you can’t play back the demos recorded with the official client (or any of its modifications).
 Newest ioquake3 versions can’t be used with 4.2 due to differences in how some QVM calls are handled.
 - diRf build is an optimized client specifically for 4.2 (although it’s usable with older versions) built from newest ioquake3 sources. It comes with dmaHD and should also support 4.2 auth; some other features from the official client are disabled for security reasons. This build deliberately lacks raw mouse input though.
- r00t’s build (based on Mitsubishi’s) supports auth, raw mouse, dmaHD and Ikalizer, as well as bumpmapping and other advanced rendering.
- p5yc0runn3r’s build is the official Quake3-UrT client with added dmaHD sound engine and raw mouse support. These features were merged into the official build in .013.
messagemode4 does exist, it does nothing.* Look in the q3ut4 folder in your UrT installation directory. If you have a file named zpak001_assets.pk3 there, you have 4.1.1.
* In the main menu, click on “start server”. Look at the map list. If you see Company, The Docks and Herring at the top of the list, you very likely have 4.1.1.
* If you see people with short sleeves in the game, you have 4.1.1.
do_stuff is set do_stuff "vstr do_stuff_on", default: set do_stuff "vstr do_stuff_on" in the console — useful in some situations, but not what we need here.